Ever noticed that when you show off a woodworking project, the first thing people do is touch it? It’s like they’re trying to feel your craftsmanship. According to James Hamilton, the mastermind behind the popular woodworking channel Stumpy Nubs, this is because humans are wired to experience the world through touch as much as sight. And let’s face it, after pouring your heart, soul, and hard-earned cash into a project, the last thing you want is for someone’s first impression to be ruined by a rough, bumpy finish. That’s why sanding between coats of finish is an absolute game-changer. Today, we’re diving deep into Stumpy Nubs’ method for perfecting your wood finishes—whether it’s polyurethane, lacquer, or shellac.
Why Sanding Between Coats Matters
So, you’ve applied your first coat of finish, and suddenly, that silky-smooth surface feels rough again. What gives? Two things likely happened: dust particles from the air settled onto the wet finish, or the wood fibers soaked up the finish and swelled. Yes, wood can be as dramatic as a reality TV star. Stumpy Nubs explains that while you can minimize swollen fibers by raising the grain before the first coat (check out his sanding tutorial for that), dust nibs are pretty much unavoidable. Even if you’ve got a dedicated, dust-free finishing room, those pesky particles will find a way. The solution? Sanding between coats—but not just any sanding. You need to do it right. And that’s where this guide comes in.
The Tools You’ll Need
Before we get into the nitty-gritty, let’s talk about the tools. Stumpy Nubs recommends starting with 320-grit sandpaper for the first coat and then moving up to 600-grit for subsequent coats. Here’s a quick shopping list to get you started:
- 320-grit sandpaper
- 600-grit sandpaper
- Mineral spirits, denatured alcohol, or water for wiping down surfaces
- A vacuum to clean up dust
And don’t forget those Isotunes Bluetooth earbuds—because who doesn’t want hearing protection and your favorite tunes while you work?
Step-by-Step Guide to Sanding Between Coats
Ready to transform your woodworking projects from “meh” to “magnificent”? Here’s how Stumpy Nubs suggests sanding between coats of finish:
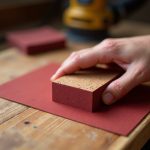
Step 1: Sand the First Coat
After applying the first coat of finish, let it dry completely. Then, grab your 320-grit sandpaper and sand the surface by hand. Use light pressure—don’t go all Hulk on it. Your goal here is to smooth out any swollen wood fibers or dust nibs without sanding off the entire coat. If your sandpaper gets gummy, give the finish more time to dry. You should see fine white dust, not sticky boogers of half-dried finish.
Pro Tip: Use both hands—one to move the sandpaper and the other to feel for imperfections. You’re basically a wood whisperer at this point.
Step 2: Clean Up the Dust
Once you’re done sanding, it’s time to clean up. Don’t use compressed air—you’ll just blow the dust around, and it’ll settle right back onto your next coat. Instead, use a vacuum to suck up the dust, followed by a wipe-down with mineral spirits, denatured alcohol, or water. Just don’t go overboard with the water—unless you want to reawaken those dramatic wood fibers.
Step 3: Apply and Sand Subsequent Coats
After the second coat of finish, dust nibs are still your enemy, but swollen fibers should be less of an issue. Switch to 600-grit sandpaper and repeat the process. By now, you’re probably noticing that thinner coats dry faster, which means less time for dust to settle. Efficiency, baby!
Want to know a secret? Stumpy Nubs often switches to a brown paper bag for the final coat. Yes, a brown paper bag. It’s cheaper than high-grit sandpaper and can make your finish as smooth as glass. Try it. You’ll thank me later.
Step 4: The Final Coat
For the final coat, patience is key. Give it at least 24 hours to dry—maybe even a few days. Then, use 1000 to 1500-grit sandpaper or that magical brown paper bag to buff out any last imperfections. By now, your project should feel like something you’d proudly display in a museum. Or at least at iNthacity: the Shining City on the Web.
Why Timing Matters Between Coats
Here’s something you might not have considered: finishes shrink as they dry. Some more than others, but they all do it. This can cause the finish to pucker on the surface, creating tiny bumps you can’t always see but can definitely feel. The solution? Light sanding with 600-grit sandpaper. And if you’re using oil-based polyurethane or shellac, timing is everything. These finishes can take weeks to fully cure, so the longer you wait between coats, the smoother your next coat will be.
Final Thoughts and Pro Tips
Sand between coats? Absolutely. Here’s why: it ensures a silky-smooth finish that feels as good as it looks. Stumpy Nubs’ method is straightforward, but it requires patience and attention to detail. Use the right grit, clean up thoroughly, and don’t rush the drying process. Oh, and invest in some Isotunes Bluetooth earbuds—because woodworking should be as enjoyable as it is rewarding.
Here’s a quick recap of the steps:
- Sand the first coat with 320-grit sandpaper.
- Clean up the dust with a vacuum and mineral spirits.
- Apply subsequent coats, sanding with 600-grit between each.
- For the final coat, wait at least 24 hours and use 1000 to 1500-grit sandpaper or a brown paper bag.
Thought-Provoking Questions for You
What’s the most challenging part of finishing your woodworking projects? Have you tried sanding between coats, or do you have a different method? Share your thoughts in the comments below! And if you’re not already part of the iNthacity community, what are you waiting for? Join us in the Shining City on the Web, where we celebrate craftsmanship, innovation, and the joy of creating something with your own two hands.

Wait! There's more...check out our gripping short story that continues the journey: Glissendo

Disclaimer: This article may contain affiliate links. If you click on these links and make a purchase, we may receive a commission at no additional cost to you. Our recommendations and reviews are always independent and objective, aiming to provide you with the best information and resources.
Get Exclusive Stories, Photos, Art & Offers - Subscribe Today!
Related posts:
 Why You Should Check Your Polyurethane and Tung Oil with Rust-Oleum for Best Results
 Avoid the Terrible Minwax Sanding Wood Trend: Protect Your Floors and Surfaces
 Experience the Revolutionary 2-Minute Wood Finish by [Brand Name] – Like Nothing You’ve Ever Seen!
 How to Finish Wood Like a Pro
 Why router tables are dangerous and can cause injuries if misused


Post Comment
You must be logged in to post a comment.