
About Stumpy Nubs
Stumpy Nubs (aka James Hamilton) is a woodworker, tool designer, and YouTube personality who’s on a mission to make woodworking accessible to everyone. His channel is packed with tips, tricks, and tutorials that are both practical and entertaining. From making your own lumber to building heirloom-quality furniture, Stumpy’s got you covered.
Not a Member? Apply to become a Permanent Resident of the Shining City on the Web
Join the iNthacity community and connect with like-minded individuals who share your passion for woodworking, innovation, and creativity. Apply now to become a permanent resident of the Shining City on the Web!
Popular on iNthacity
Now, who’s ready to get back in the shop and make some magic happen?
About the Author
This article was written by The iNthacity Team. We’re a community of creators, innovators, and woodworking enthusiasts who believe in the power of sharing knowledge. Join us in celebrating the art of woodworking and become a permanent resident of the Shining City on the Web.
Related Articles
- How to Sharpen Your Tools Like a Pro
- The Ultimate Guide to Wood Finishes
- 5 Woodworking Projects for Beginners
Let’s create something amazing together!
```
Ever wanted to make two pieces of wood fit together so perfectly it feels like magic? Stumpy Nubs (James Hamilton) has the ultimate hack for you. In his latest video, he breaks down a method so simple yet so satisfying that you’ll be hunting for scraps in your shop just to try it out. I’m talking about lap joints—the unsung heroes of woodworking that make your projects look and feel professional. Whether you’re building a dining table, a bench, or just tinkering with scraps, this technique will elevate your game and make you feel like a woodworking wizard. Let’s dive in!
Why Lap Joints Matter
First, why should you care about lap joints? They’re strong, they’re clean, and they’re versatile. Unlike just nailing two pieces of wood together (which, let’s be honest, can look amateur), lap joints distribute the stress evenly across the joint, making your project sturdier and more polished. But here’s the catch: lap joints can be tricky, especially if you’re trying to make them look seamless. That’s where Stumpy Nubs’ method comes in. Follow along, and you’ll never stress over lap joints again.
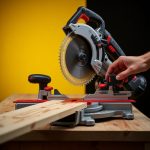
Setting Up Your Table Saw
Stumpy starts with a table saw, but don’t worry if you don’t have one—this method works just as well with a router table and a straight bit. If you’re using a table saw, a dado stack can make the job easier, but it’s not essential. A flat grind rip blade will do the trick, as long as it cuts a reasonably flat-bottomed kerf. The real secret sauce here? A little scrap of wood. This scrap must be exactly as thick as your saw blade so it fits inside the kerf perfectly. Stumpy calls this the “shim,” and it’s your new best friend. Take the time to get this right, and you’ll save it for every lap joint project in the future.
Measuring Blade Height the Smart Way
Here’s where Stumpy Nubs’ brilliance shines. Instead of measuring the thickness of your wood, he suggests setting the blade height by eye—just below the center point of your workpiece. Make a cut on one face, flip it over, and cut the opposite face. Repeat this process, slowly raising the blade until the final pass just skims off the remaining fibers. Boom! You’ve set your blade height to exactly half the thickness of your workpiece. No math, no stress, just pure woodworking intuition.
The Magic of the Shim
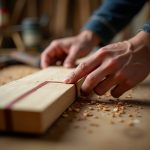
Now, let’s talk about that shim again. It’s not just a scrap of wood—it’s the key to precision. When you’re making an end lap joint, you’ll place your workpiece against the miter fence and clamp a stop block in place. But here’s the trick: if you put the end of your workpiece right against the stop block, your first cut will be too far to the right because the thickness of the blade needs to be accounted for. That’s where the shim comes in. Place it between the end of your workpiece and the stop block, and you’re golden. Simple, right?
End Laps: The Basics
Stumpy walks us through making end lap joints first. It’s as straightforward as it gets. Use one workpiece to set your stop block, then use the shim to offset the blade. Make your cuts, flip the workpiece, and repeat. The wider your blade or router bit, the fewer passes it’ll take to remove the waste. Once you’ve done this on both ends of your workpieces, you’ll have a joint that fits like a glove. Flush edges, perfect alignment, and a whole lot of satisfaction. Who knew woodworking could feel this good?
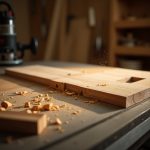
Crosslaps: Leveling Up
Crosslaps might look intimidating, but Stumpy’s method makes them a breeze. Start by marking where you want the cutout to be on your workpiece. Align the blade to the left of that line and set your stop block there. Use the shim to compensate for the blade’s thickness, make your first cut, then use the mating workpiece (or a scrap of the same width) as a second shim for the second cut. Remove the waste in between, and voilà! You’ve got a crosslap joint that’s so precise, you’ll want to show it off to everyone you know.
Angled Lap Joints: The Ultimate Challenge
Ready to take it up a notch? Stumpy shows us how to make angled lap joints, like the ones used in his dining table project. The angle he’s working with is 10 degrees, so the end of the workpiece, the miter gauge, and even the stop block and shim are all set to that angle. The process is same as before, but with a slight twist—literally. The angled setup ensures everything fits together seamlessly, even if you’re cutting at a wonky angle. If you’re using a dado stack, the process is even faster. But remember, the shim is still the star of the show. Match it to your dado stack or router bit, and you’re good to go.
Why This Method Works Every Time
What makes Stumpy Nubs’ method so foolproof? It’s all about precision and simplicity. The shim ensures your blade or bit is always in the right place, and the stop block guarantees consistent cuts. Whether you’re a beginner or a seasoned pro, this technique takes the guesswork out of lap joints and leaves you with a joint that’s as strong as it is beautiful. And let’s be honest, who doesn’t love the feeling of a perfectly fitting joint? It’s like solving a puzzle and getting that final piece to click into place. Pure magic.
Tools and Gear You’ll Need
Before you run off to your shop, let’s talk tools. Here’s what you’ll need to get started:
- Table Saw or Router Table: Either will work, but a table saw is Stumpy’s tool of choice.
- Flat Grind Rip Blade or Dado Stack: A dado stack makes the job faster, but a flat grind rip blade will do the trick.
- Miter Gauge with Sacrificial Fence: Stumpy extends his fence past the blade for added stability.
- Shim: This little scrap of wood is the secret to perfect lap joints.
- Clamps: To secure your stop block and workpiece in place.
If you’re in the market for any of these tools, check out Teds Woodworking Plans for some great deals. And don’t forget to protect your ears! Stumpy recommends ISOtunes Bluetooth Hearing Protection, which you can snag at a 30% discount using his promo code.
The Bigger Picture: Why Woodworking Matters
Woodworking isn’t just about making stuff—it’s about creating something tangible, something that lasts. In a world of disposable everything, there’s something deeply satisfying about crafting a piece of furniture that’ll stand the test of time. Lap joints are more than just a technique; they’s strong, they’re clean, and they’re versatile. Unlike just nailing two pieces of wood together (which, let’s be honest, can look amateur), lap joints distribute the stress evenly across the joint, making your project sturdier and more polished. But here’s the catch: lap joints can be tricky, especially if you’re trying to make them look seamless. That’s where Stumpy Nubs’ method comes in. Follow along, and you’ll never stress over lap joints again.
Setting Up Your Table Saw
Stumpy starts with a table saw, but don’t worry if you don’t have one—this method works just as well with a router table and a straight bit. If you’re using a table saw, a dado stack can make the job easier, but it’s not essential. A flat grind rip blade will do the trick, as long as it cuts a reasonably flat-bottomed kerf. The real secret sauce here? A little scrap of wood. This scrap must be exactly as thick as your saw blade so it fits inside the kerf perfectly. Stumpy calls this the “shim,” and it’s your new best friend. Take the time to get this right, and you’ll save it for every lap joint project in the future.
Measuring Blade Height the Smart Way
Here’s where Stumpy Nubs’ brilliance shines. Instead of measuring the thickness of your wood, he suggests setting the blade height by eye—just below the center point of your workpiece. Make a cut on one face, flip it over, and cut the opposite face. Repeat this process, slowly raising the blade until the final pass just skims off the remaining fibers. Boom! You’ve set your blade height to exactly half the thickness of your workpiece. No math, no stress, just pure woodworking intuition.
The Magic of the Shim
Now, let’s talk about that shim again. It’s not just a scrap of wood—it’s the key to precision. When you’re making an end lap joint, you’ll place your workpiece against the miter fence and clamp a stop block in place. But here’s the trick: if you put the end of your workpiece right against the stop block, your first cut will be too far to the right because the thickness of the blade needs to be accounted for. That’s where the shim comes in. Place it between the end of your workpiece and the stop block, and you’re golden. Simple, right?
End Laps: The Basics
Stumpy walks us through making end lap joints first. It’s as straightforward as it gets. Use one workpiece to set your stop block, then use the shim to offset the blade. Make your cuts, flip the workpiece, and repeat. The wider your blade or router bit, the fewer passes it’ll take to remove the waste. Once you’ve done this on both ends of your workpieces, you’ll have a joint that fits like a glove. Flush edges, perfect alignment, and a whole lot of satisfaction. Who knew woodworking could feel this good?
Crosslaps: Leveling Up
Crosslaps might look intimidating, but Stumpy’s method makes them a breeze. Start by marking where you want the cutout to be on your workpiece. Align the blade to the left of that line and set your stop block there. Use the shim to compensation for the blade’s thickness, make your first cut, then use the mating workpiece (or a scrap of the same width) as a second shim for the second cut. Remove the waste in between, and voilà! You’ve got a crosslap joint that’s so precise, you’ll want to show it off to everyone you know.
Angled Lap Joints: The Ultimate Challenge
Ready to take it up a notch? Stumpy shows us how to make angled lap joints, like the ones used in his dining table project. The angle he’s working with is 10 degrees, so the end of the workpiece, the miter gauge, and even the stop block and shim are all set to that angle. The process is same as before, but with a slight twist—literally. The angled setup ensures everything fits together seamlessly, even if you’re cutting at a wonky angle. If you’re using a dado stack, the process is even faster. But remember, the shim is still the star of the show. Match it to your dado stack or router bit, and you’re good to go.
Why This Method Works Every Time
What makes Stumpy Nubs’ method so foolproof? It’s all about precision and simplicity. The shim ensures your blade or bit is always in the right place, and the stop block guarantees consistent cuts. Whether you’re a beginner or a seasoned pro, this technique takes the guesswork out of lap joints and leaves you with a joint that’s as strong as it is beautiful. And let’s be honest, who doesn’t love the feeling of a perfectly fitting joint? It’s like solving a puzzle and getting that final piece to click into place. Pure magic.
Tools and Gear You’ll Need
Before you run off to your shop, let’s talk tools. Here’s what you’ll need to get started:
- Table Saw or Router Table: Either will work, but a table saw is Stumpy’s tool of choice.
- Flat Grind Rip Blade or Dado Stack: A dado stack makes the job faster, but a flat grind rip blade will do the trick.
- Miter Gauge with Sacrificial Fence: Stumpy extends his fence past the blade for added stability.
- Shim: This little scrap of wood is the secret to perfect lap joints.
- Clamps: To secure your stop block and workpiece in place.
If you’re in the market for any of these tools, check out Teds Woodworking Plans for some great deals. And don’t forget to protect your ears! Stumpy recommends Wait! There's more...check out our gripping short story that continues the journey: Shimmer Frame

Disclaimer: This article may contain affiliate links. If you click on these links and make a purchase, we may receive a commission at no additional cost to you. Our recommendations and reviews are always independent and objective, aiming to provide you with the best information and resources.
Get Exclusive Stories, Photos, Art & Offers - Subscribe Today!
Related posts:
 10 Ways to Get BANNED from a Woodworking Shop Forever: Avoid These Mistakes with DeWalt Tools
 Never Worry About Woodworking Clamps Again with DeWalt’s Top Tools and Tips
 10 Clever Bosch Flush Trim Router Bit Hacks for Perfect Woodworking Projects
 Transform Your Woodworking: How DeWalt’s Miter Saw Might Change the Way You Cut
 7 Clever Workshop Tool Ideas That Transformed My Workspace, Including DeWalt Essentials


Post Comment
You must be logged in to post a comment.