If you've ever struggled with creating strong, seamless joints in your woodworking projects, you're not alone. Enter the lock miter bit, one of the most ingenious tools in modern woodworking. In this article, we’ll dive deep into the world of lock miter bits, inspired by Stumpy Nubs (James Hamilton), a woodworking guru who simplifies the complex and makes the intimidating approachable. Whether you're a seasoned pro or a weekend warrior, this guide will help you master the lock miter bit and elevate your woodworking game.
What Makes the Lock Miter Bit So Special?
The lock miter bit is a game-changer for woodworkers. Why? Because it does two things at once: it cuts a perfect 45-degree bevel and creates a mechanical joint that’s stronger than glue alone. Imagine building a box or frame without the frustration of pieces slipping and sliding under clamping pressure. Sounds like a dream, right? Well, it’s possible with this magical bit.
But here’s the catch: lock miter bits have a reputation for being tricky to set up. YouTube is flooded with videos promising to solve this problem, but many of them overcomplicate the process. Stumpy Nubs cuts through the noise and shows us two simple methods to set up a lock miter bit—one using digital tools and another that’s completely tool-free. Let’s break it down.
Method 1: The Digital Approach
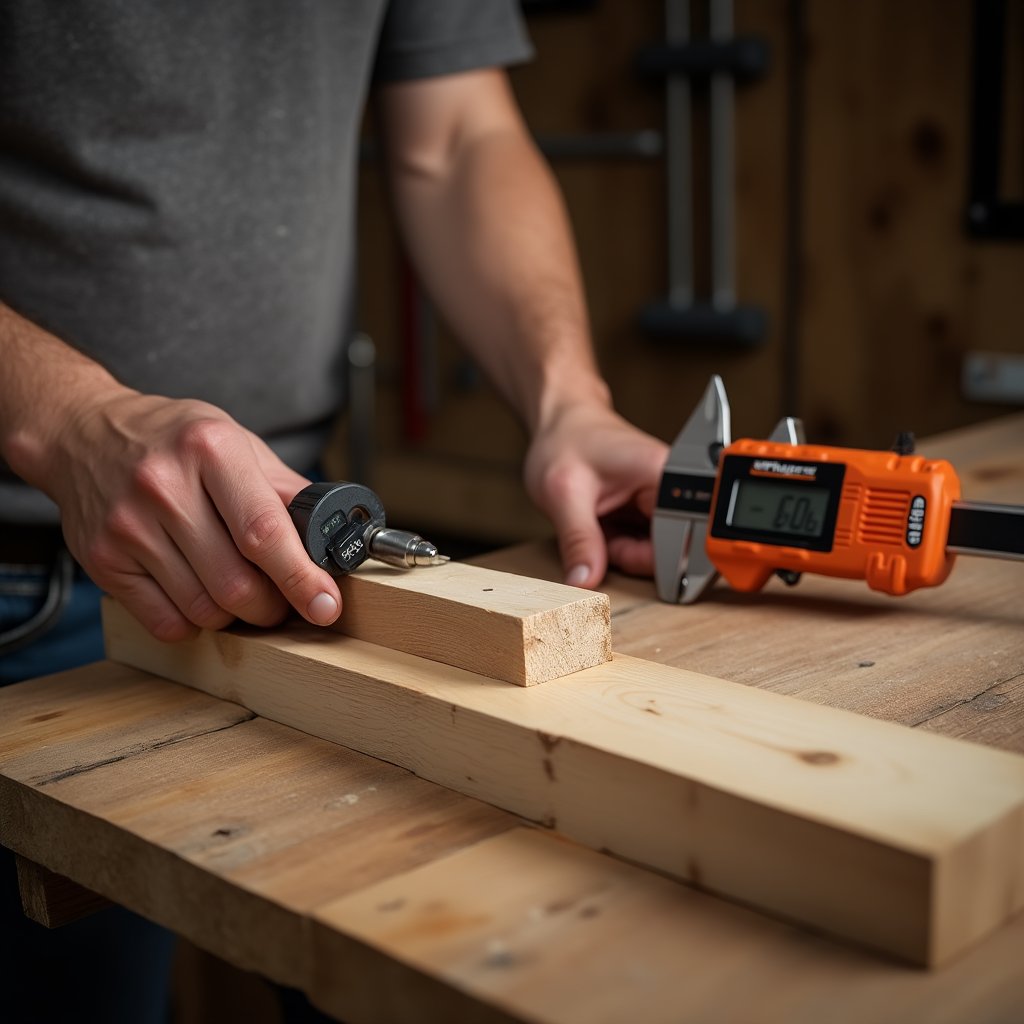
If you’re a fan of precision and have a digital caliper and height gauge handy, this method is for you. Here’s how it works:
- Measure the full height of the bit’s cutters using the caliper.
- Measure the thickness of your material.
- Divide both numbers in half and add them together. This sum is the height you need to set your bit above the table.
But wait—don’t skip the test cut! Stumpy Nubs emphasizes the importance of making a test cut on a scrap piece, flipping it, and checking if the surfaces are flush. If they’re not, you’ll need to make tiny adjustments. This method is quick, precise, and perfect for those who love working with numbers.
Method 2: The No-Tools Approach
Don’t have a digital caliper? No problem. Stumpy Nubs has a slower but equally effective method that requires no special tools. Here’s how it works:
- Find the exact center of your workpiece and mark it with a fine pencil.
- Align the center of your board with the center of the router bit’s cutting area.
- Set the fence by eye, making sure the cutter just barely touches the lower corner of the workpiece.
Again, a test cut is crucial. Trim the end, cut it in half, and check if the surfaces are flush. If not, adjust the bit height by half the offset and try again. This method is perfect for those who prefer a hands-on, intuitive approach.
Setting Up the Fence: The Final Touch
Once your bit height is dialed in, setting up the fence is a breeze. Place your workpiece against the fence and lay a ruler on the table. Adjust the fence so the cutter just barely scrapes the ruler. Confirm the position by laying the workpiece flat and checking again. If the cutter scrapes the ruler in both positions, you’re good to go!
Bonus Tip: The Holy Grail of Wood Finishes
Now that you’ve mastered the lock miter bit, let’s talk about finishes. Stumpy Nubs introduces us to Clean Armor, a revolutionary wood finish that cures in just 2 minutes under UV light. Yes, you read that right—2 minutes! This low-VOC, odorless finish is safe to use indoors without a respirator and offers unmatched durability. It’s a bit pricey, but the benefits—like saving time and space—make it worth every penny.
Why This Matters
Woodworking isn’t just about building things; it’s about creating something beautiful, functional, and lasting. Tools like the lock miter bit and finishes like Clean Armor empower us to push the boundaries of what’s possible in our craft. They save us time, reduce frustration, and allow us to focus on the joy of creation.
So, what’s stopping you from trying these techniques? Are you ready to take your woodworking to the next level? Let us know in the comments below!
Join the iNthacity Community
If you enjoyed this article, why not become part of the iNthacity community? Apply to become a permanent resident of the "Shining City on the Web," where creativity and craftsmanship thrive. Like, share, and participate in the debate—your voice matters!
And if you're looking for more woodworking plans and inspiration, check out Ted’s Woodworking Plans. With thousands of projects to choose from, you’ll never run out of ideas.
![hqdefault This Will Make SO MANY of You Very Happy – A Must-See Update from [Brand Name]!](https://i.ytimg.com/vi/60cPaFwHm1Y/hqdefault.jpg)
Final Thoughts
Woodworking is a journey, and every tool, technique, and finish you master brings you one step closer to perfection. The lock miter bit and Clean Armor are just two examples of how innovation can transform your craft. So, what’s your next project? Will you try the lock miter bit or experiment with Clean Armor? Let’s hear your thoughts!
Wait! There's more...check out our gripping short story that continues the journey: The Lock Miter
![story_1737519468_file This Will Make SO MANY of You Very Happy – A Must-See Update from [Brand Name]!](https://www.inthacity.com/blog/wp-content/uploads/2025/01/story_1737519468_file.jpeg)
Disclaimer: This article may contain affiliate links. If you click on these links and make a purchase, we may receive a commission at no additional cost to you. Our recommendations and reviews are always independent and objective, aiming to provide you with the best information and resources.
Get Exclusive Stories, Photos, Art & Offers - Subscribe Today!
Related posts:
 Must-Watch Guide: Safety Tips Before Letting Your Child Use DeWalt Tools or Any Brand
 Experience the Revolutionary 2-Minute Wood Finish by [Brand Name] – Like Nothing You’ve Ever Seen!
 WARNING: Internet Drill Press Trend Using [Brand Name] Tools Can SERIOUSLY Hurt You! Stay Safe!
 Discover Why Vernier Scales by [Brand Name] Are AMAZING Precision Tools!
 Do We Need Struggle to Be Happy? Rethinking Contentment in a Post-Work Era


Post Comment
You must be logged in to post a comment.